Sending Attachments as Links in Outlook
One of my favorite productivity tips!
If you’ve spent any amount of time collaborating on a document with people on a single artifact, the multiple ways in which you can co-edit files has been a massive leap forward in technology. I started my career as a technical writer and then a business analyst, and throughout my career spent countless hours chasing people for their input, and then had to merge, stare-and-compare, and edit. One of the more frustrating aspects of collaboration is that people duplicate content: people make an edit, then send their edited version as an email attachment rather than edit the shared version provided in SharePoint, OneDrive, or another cloud platform.
Please stop doing this! Turn revision marks on in your document, upload your file to one of your many cloud options, and send a link instead of an attachment!
Did you know that you can set your own default send option in your Outlook client? That’s right. Practice safe collaboration, people, and make this change today! This productivity tip is not in any way a new feature, but I find myself regularly telling people about it, so I thought I would share again here. This tip comes from the Microsoft support archives, and was one that I shared in the July 2019 Productivity Tips webinar, which you can watch in its entirety or download the slides, or jump to this exact tip in the video by clicking here.
Change your default
As always, there are some caveats. When working with cloud files (SharePoint, OneDrive) you can set the default attachment state to a link rather than always attaching a copy of a file. However, if your file originates from a non-cloud location (for example, a local file) you’ll have the option to upload this file to the cloud. I’ll come back to that.
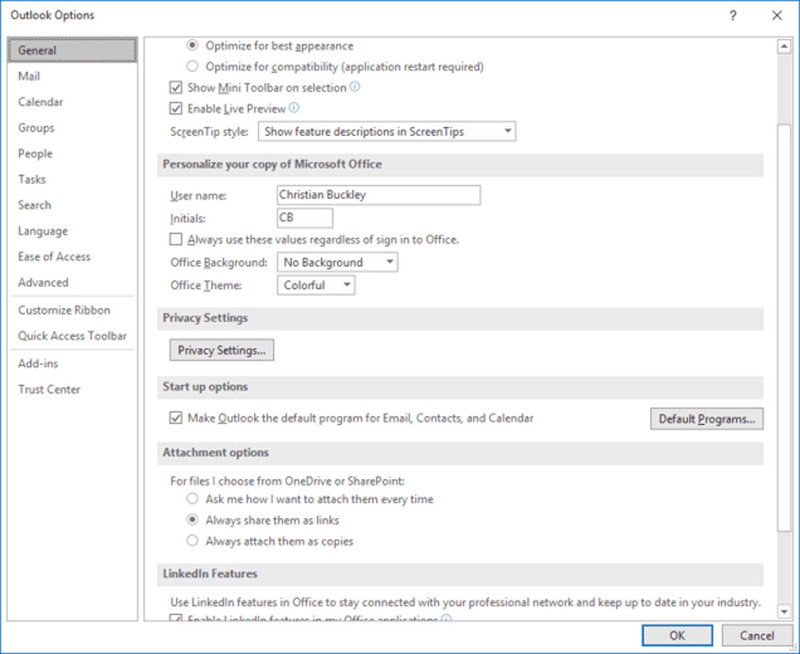
To get started, in your Outlook desktop app, go into File, then Options, and look within the General section for Attachment Options. Select Always share them as links and click Ok.

That’s all you need to do to change your default; you’re now ready to send attachments as links!
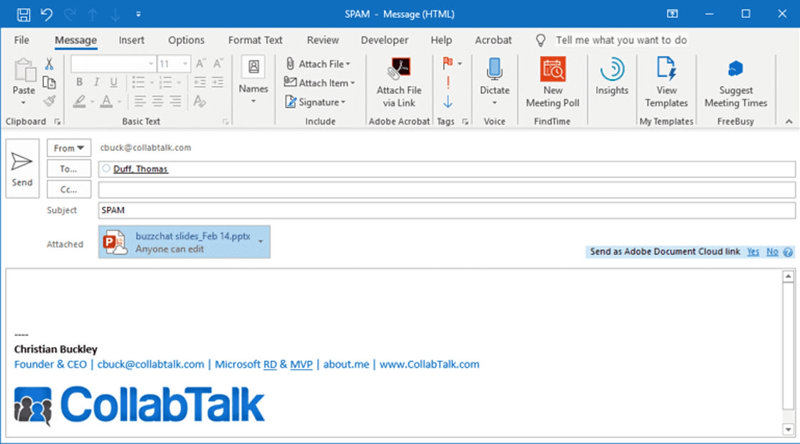
Next, open a new email message and select Attach File. Navigate to the relevant cloud-based file you’d like to share and attach. The file will attach with the cloud icon and, by default, will say Anyone can edit. As your recipients open this file, they will be viewing and/or editing the document from within your cloud environment.

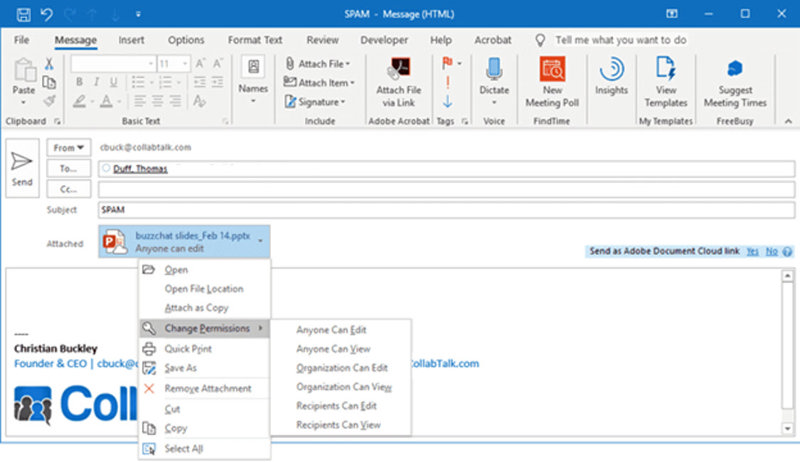
Click on the drop-down arrow on your file to see additional options, such as removing the attachment or changing the permissions. To be clear, there is nothing further you need to do within SharePoint or OneDrive to modify these permissions. What is happening here is that you’re creating item-level permissions for this file — giving people who might not otherwise have access to this file location the ability to view and/or edit this single artifact. Your organization should have governance policies established around file sharing and will likely limit the time that the link will work (anywhere from 7 to 30 days), after which you’ll need to re-share.

Some organizations may not enable external sharing. If that is the case, you’ll only be able to share links via your personal OneDrive account. If the steps above do not work for you, your next step should be to discuss the governance policies of your environment with your admin to better understand those policies, and to possibly request they be opened up.
Handling Local Files
For local files that are not in the cloud, you can attach them to your email per the steps outlined above, then select the right arrow on the file and select the option to save it to the cloud. You’ll see all of your available options, and can select the sharing location. This manual upload allows you to manually change an attachment to a link, so there are no excuses about creating duplicate content!
I hope you find this productivity tip helpful.


